Tuesday, December 31, 2013

Make Art lo!

Hi everyone! Today I'd like to share a lo that I made using My Favorite Things "Concentric circles" stencil. Love MFT stencils to bits! They are great for large background coverage and for when you just need a little something, like I used here.
 
 
Here's the fabulous "Concentric circles" stencil:

Stencil MPD Concentric Circles
 
And here is a close-up of the stencil in use:
 

For this lo, I used modeling paste, but these stencils are made with such high quality that you could use paints, inks, or sprays very nicely.
 

If you would like to take a peek at MFT stencils, or some of their other fabulous goodies, you can here. And while your there, be sure to check out their blog. You're going to be amazed with the inspiration from their DT!
 
As always, thank you for stopping by and have a wonderful day!
Hugs!


Wednesday, December 25, 2013

Up-cycled paper clip box tutorial!

Hi everyone! Today I'd like to share an up-cycled paper clip box tutorial that I put together for the Paperdvizhnik blog. This is super easy and could be used for any type box that you might have.


To begin, I wanted to make something for the Holiday, so I decided on a Christmas tree. From here, I gathered up a bunch of supplies that I thought would go together well.
 

Once my supplies were gathered, I applied gesso to the paper clip box.
 
 
Once the gesso was dry, I applied some paint to a cut out star and the paper clip box. I then shaded around the edges.
 
 
After applying color to the sides of the box, I smeared the color with my finger and then did some light stamping on the sides with a 'number' stamp that I had.
 
Next I cut different paper shapes, applied paint and sparkles.
 
 
Once the paint was dry, I adhered the layers of paper to the box.
 
I then trimmed my tree with buttons and a ribbon trim at the bottom. At this point, the box is finished and could be used as is, or tied with a ribbon/bow.
 
 
I've also added another box, that I did a little while back, to give you an example of other possibilities for your box. Really, any kind of image would be very pretty to add to a box!


I hope you'll give this project a try....you could give it your own special look with something that has meaning to you or to someone that you'd like to give it to.
 
As always, thank you for stopping by and have a wonderful day!
Hugs!


Tuesday, December 17, 2013

Holiday Cheer!

Hi everyone! This is such an exciting time of the year. Holiday preparation is in full force and those precious memories, to be made, are just around the corner.  We all want to capture them and keep them dear to our hearts the best way that we know how. This year, I decided that I would put together a mini book by prepping the pages, for photos and documenting, ahead of time. So today,  as part of our DT 'desk' adventure at Paperdvizhnik, I'd like to share a glimpse of what's on my desk, at the moment, and how I'm putting together my mini.

 I've covered the front of my book with patterned paper, ribbon, and a vintage button.
 

Some of the staples, that I'm using for the pages, and use on most everything that I create, are alphas and stickers:
 

I think a variety will add interest to each page and make the photo's that I put on them 'pop'!
 
Another biggy of mine are stamps and some kind of cloth. I've gathered what I had for Christmas/Holiday stamps and then purchased some nice Holiday print fabric to cut up and use throughout the book in different ways.


As I'm decorating each page, I find myself getting more and more excited for the holidays to come.....all the prep will be done and then I can just adhere the pics.....yeah! I don't know why I didn't do this for previous years!!!
Part of my large stash is ribbon.....I just can't seem to get enough. It's great for adding bits and pieces or large amounts like the bow on the front cover.....it's just adds a nice 'prettiness' to anything.
 
My next photo is me putting gesso on the pages. Love gesso....it keeps colors nice and bright!
 

The gesso also gets rid of some of the lines on the middle part of the page so as to draw focus where you want.
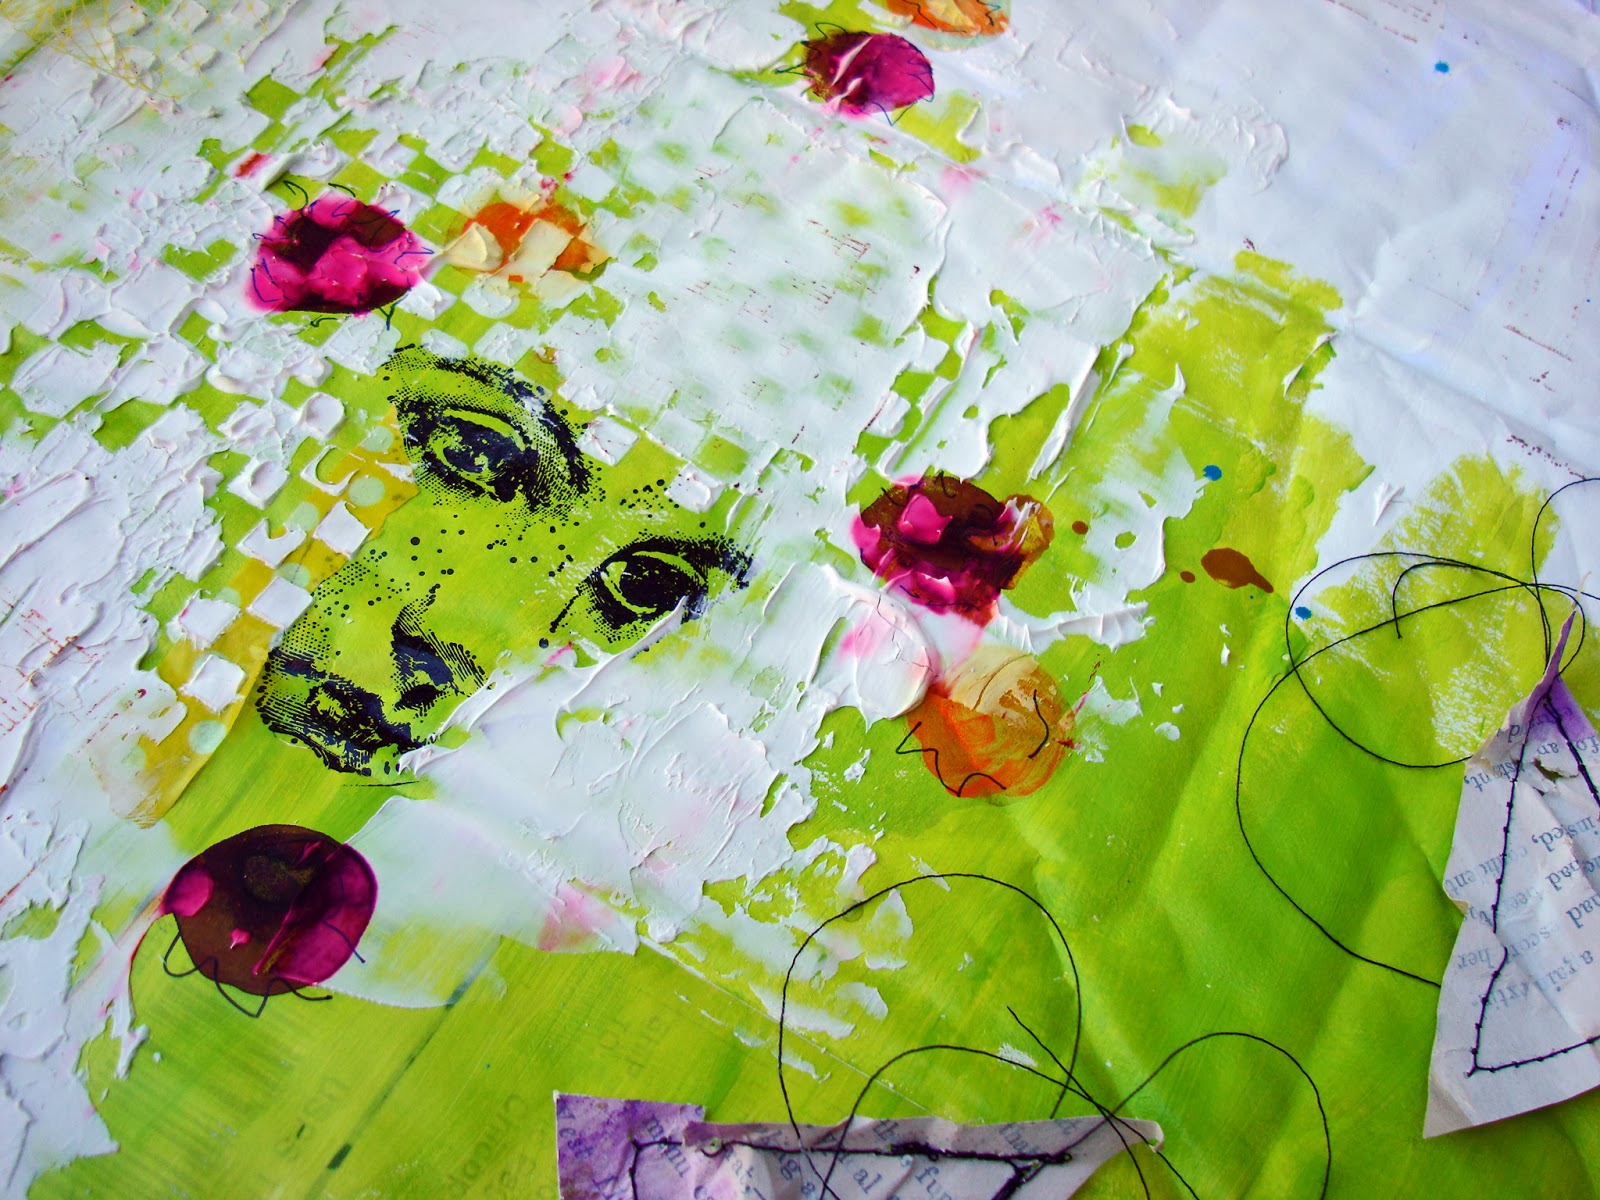
Here is a photo of one of my pages:
 
Love the vintage girl and the child like faith that she represents.....perfect for Christmas. For this page, I'll tuck a little documentation note into the cloth, in front of the vintage-like card.
 
The next page, I am presently working on. So far I have added some color, stamped, and added cloth....I think I need a tad more coloring....
 
Yup, the page is still wet.....work in process! Oh yes, I forgot to mention, that another staple, which is always on my desk, is a cup a coffee, which you can see in the pic.....lol!
 
Christmas morning, I will get a family pic and adhere it to the right of the page....how easy is that going to be!

Are you making preparations for your Holiday memories? I'd love to hear what you're doing!

As always thank you for stopping by and have a wonderful day!
Hugs!
 

Monday, December 9, 2013

Christmas memories!

Hi everyone! Today I'd like to share a lo that I made using My Favorite Things 'Petal pattern' stencil. Love this stencil....so versatile! For me, I thought think it gives the lo a snowflake feeling to it. It certainly could be used for flowers or just an absolutely pretty background.


The stencil:

Stencil MPD Petal Pattern
 
Here's a close-up of the stencil:


If you would like to take a peek at more of the fabulous stencils, and other wonderful goodies that My Favorite Things has to offer, you can here. You're going to love what you see! And while you're there, be sure to check out their blog for some amazing inspiration!
 
As always, thank you for stopping by and have a wonderful day!
Hugs!


Lemon-Owl giveaway!

Yippee! Lemon-owl is having a First Anniversary giveaway! A surprise.....love surprises and some paper collections! Oh yes, I'd LOVE to win this giveaway! For all the details, you can go here. You're going to love what you see!
 
This is such a wonderful blog site with big time talent!
 
As always, thank you for stopping by and have a wonderful day!
Hugs!

Thursday, November 28, 2013

Using negative space ~ Paperdvizhnik challenge!

Hi everyone! Today I'd like to share a lo that I made for the latest Paperdvizhnik challenge. For this challenge, we would like you to create something using negative space. What do I mean?...we want you to highlight the negative space by combining two images into one! Fun, mind boggling, creative?????.......you decide!!!! Here is the challenge and some examples to get your creative juices flowing.
 
The challenge:
 
 
Examples:


Here is the lo that I came up with. For me, I used the negative space of the bike's handlebars to form a deer. The stars are the deer's antlers.
 
 
Close-up:


I can't wait to see what you come up with! For more ideas and inspiration, I invite you to our blog.
 
As always, thank you for stopping by and have a wonderful day!
Hugs!


Monday, November 25, 2013

Christmas canvas!

Hi everyone! Today I'd like to share a canvas that I made, for Christmas decoration, using My Favorite Things 'Scallops'  stencil. Love MFT stencils to bits! When I first saw this 'lovely' I thought It would make a wonderful accent in order to make my tree look real....love how the stencil gave it life!


Here's the "Scallops" stencil that I used:
 
Stencil MPD Scallops
 
Yup, I flipped the stencil and voila I had a lovely tree look!
 
Here are some close-ups:


For the background, I used some vintage book paper and a sewing pattern cover.


For my tree, I used old ledger paper, which I tinted and then then added the stencil work and more color.


I topped off the tree with a star made from up-cycled packaging material.
 
If you'd like to take a peek at the awesome stencils, as well as the other yummy goodies that MFT has to offer, you can here. And while you're there, you're going to want to check out their blog for some amazing inspiration!
 
As always, thank you for stopping by and have a wonderful day!
Hugs!


Thursday, November 21, 2013

Christmas is around the corner...oh my!

Hi everyone! Today I'd like to share a Christmas card that I made for the upcoming Holiday. It's coming fast, so I figured I better get started now! I had the pleasure of my sister's company, this weekend, to make Christmas cards and this is what I came up with. I  used some Tim Holtz die cuts for the trees and dear. Now I just need about 30 more....lol!


Close-ups:


As always, thank you for stopping by and have a wonderful day!
Hugs!


Wednesday, November 13, 2013

I see you!

Hi everyone! Today I'd like to share a lo that I did for the Paperdvizhnik  'hide and seek' challenge. For this challenge, I used a precious moment where our sweet dog was hiding in his blanket and peeked out, just as I took the picture. We challenge you to show us a project that represents the idea  of the game hide and seek.
 
 
The challenge:
 
 
Close-up:


I invite you to play along. Can't wait to see what you come up with!
 
As always, thank you for stopping by and have a wonderful day!
 
Hugs!


Tuesday, November 5, 2013

The red cup!

Hi everyone! Today I'd like to share a lo that I made using My Favorite Things "winged beauties" stencil. I thought it was perfect for a happy, upward, steam effect for the yummy pumpkin spice latte that I had, in the first red cup of the Season.
 
 
Here's the stencil:
 
Stencil MPD Winged Beauties
 
Here's a close-up: of the beauties:
 
 
I used modeling paste on one, and twinkling H2O's on the other and then outlined them with a marker.


If you would like to take a peak at the fabulous stencils that MFT has to offer, you can here.
 
Be sure to check out what the DT has put together using all the wonderful goodies in the store. You're going to be soooooooooo inspired!
 
As always, thank you for stopping by and have a wonderful day!
Hugs!


Tuesday, October 29, 2013

Texture fun!

Hi everyone! Today I'd like to share a project that I made for the latest Paperdvizhnik challenge. This challenge is all about texture. I really had fun with this one! For me, I decided to use an old clipboard that I had. First I added an old vintage music sheet to the background and then I built the clipboard up to where I wanted using gesso, modeling paste, paints, inks, and other vintage goodies that I love. I thought this would be perfect to hang some small items from, in my scrap room.
 
 
Here's the challenge...use texture of any nature:


Here are some close-ups:
 
 
From this pic, you can see that I combined different forms of texture.
And another close-up:


I invite you to try this challenge...it really is a fun one! And please be sure to stop by our blog to see what the DT has come up with for this...so inspiring!
 
As always, thank you for stopping by and have a wonderful day!
Hugs!


Tuesday, October 22, 2013

Collecting dreams!

Hi everyone! Today I'd like to share a project that I made using an awesome My Favorite Things stencil. Love the stencils that MFT has to offer! For this project, I painted on a large envelope, that I received in the mail, and used modeling paste with the stencil. I thought I would use this envelope to collect different ideas and art of mine.


Here is the stencil that I used:
 
Stencil MPD Checkerboard
 
Love the look of the large and small square sizes used together.
 
Close-ups:


Isn't this a cool stencil! I love it, and so won't you!!!


If you'd like to take a peak at the amazing stencils, or some of the other yummy goodies that MFT has to offer, you can here. You're going to love what you see, and be sure to visit MFT blog, for lots of inspiration!!!
 
As always, thanks for stopping by, and have a wonderful day!
Hugs!


Related Posts Plugin for WordPress, Blogger...